
在上文中,我们分析了 AFL 插入基本块入口的桩代码。其中有一个 __afl_maybe_log 函数被用于修改 shm 内存区域,而这块内存区域的初始化、fork server 等内容,都在 main payload 这一段约 300 行的汇编中。
本文便来解析这一套 main payload。我们暂且只关心 x64 Linux 平台下的版本。
0x01 共享内存初始化
先用 IDA 看一下基本块:
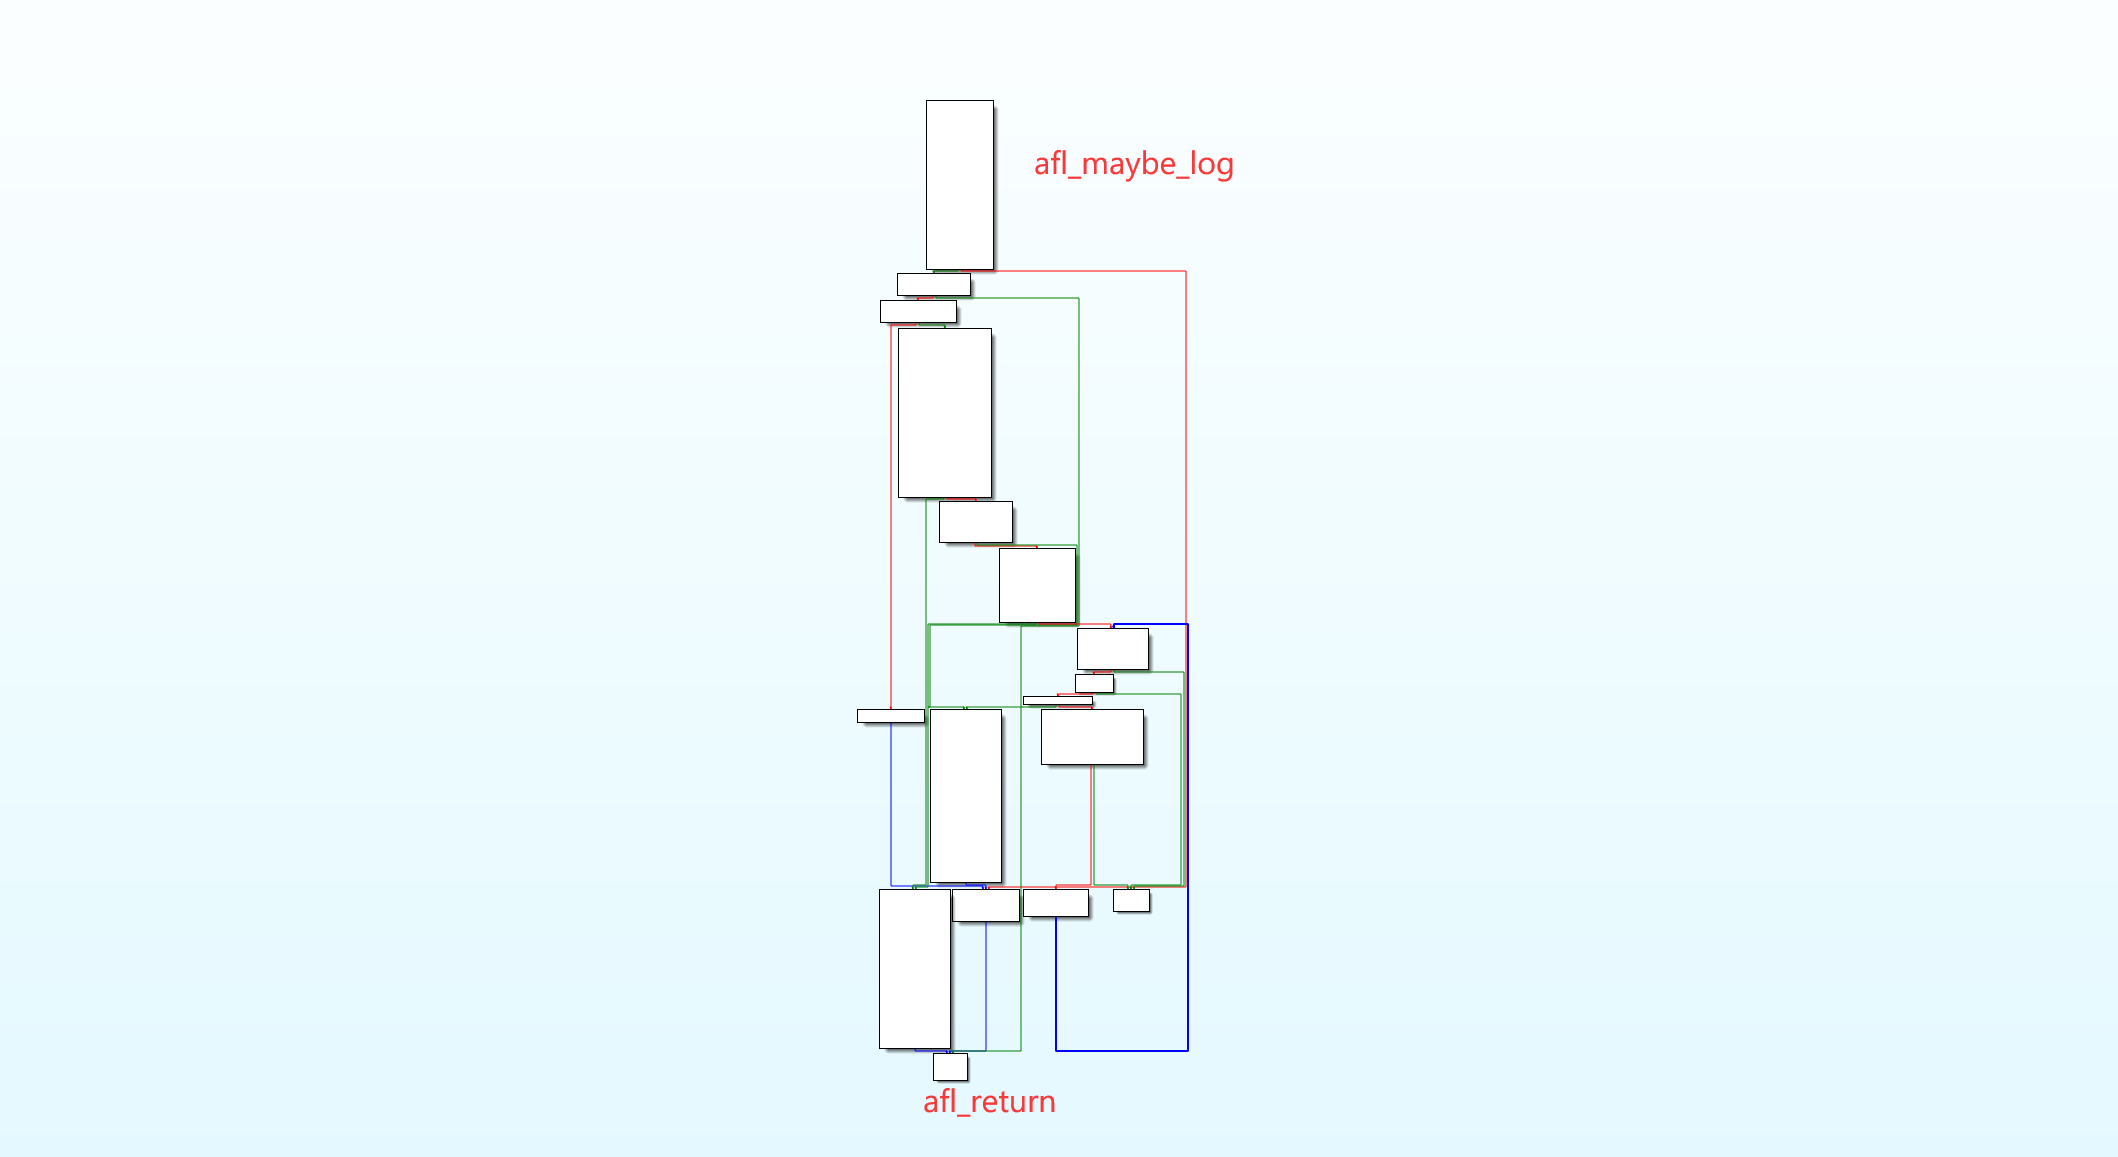
可见这段代码的入口点有且仅有 __afl_maybe_log。在上一篇文章中,我们已经追踪过 AFL 是如何记录基本块跳转的:简而言之,桩代码将几个寄存器的值保存在栈上,然后调用 __afl_maybe_log ;__afl_maybe_log 首先保存当前 EFLAGS 寄存器状态,然后检查 shm 区域是否准备好;如果已经准备好,则进入 __afl_store 过程,给 shm 区域增加 hit count 后返回。
那么,如果此时 shm 区域没有准备好呢?这就是本文的关注点。
__afl_maybe_log:

  lahf
  seto  %al

  /* Check if SHM region is already mapped. */

  movq  __afl_area_ptr(%rip), %rdx
  testq %rdx, %rdx
  je    __afl_setup

__afl_store:

  /* Calculate and store hit for the code location specified in rcx. */

  xorq __afl_prev_loc(%rip), %rcx
  xorq %rcx, __afl_prev_loc(%rip)
  shrq $1, __afl_prev_loc(%rip)

  incb (%rdx, %rcx, 1)

__afl_return:

  addb $127, %al
  sahf
  ret
__afl_maybe_log 代码。如果 shm 区域已经准备好,则直接写入 shm 后返回 从汇编中,我们看到,如果 __afl_area_ptr 等于 0,则认为 shm 没有映射好,进入 __afl_setup 逻辑。这里提一句, afl_area_ptr 这个 8 字节的变量是定义在 main payload 的末尾,一个 .lcomm 伪指令。在汇编阶段完成后,它被放在 .bss 段。
跟进 __afl_setup :
__afl_setup:

  /* Do not retry setup if we had previous failures. */

  cmpb $0, __afl_setup_failure(%rip)
  jne __afl_return

  /* Check out if we have a global pointer on file. */

  movq  __afl_global_area_ptr@GOTPCREL(%rip), %rdx
  movq  (%rdx), %rdx
  testq %rdx, %rdx
  je    __afl_setup_first

  movq %rdx, __afl_area_ptr(%rip)
  jmp  __afl_store
首先,如果发现 __afl_setup_failure 变量不等于 0,则直接返回;接着,尝试从 GOT 表中取 __afl_global_area_ptr,如果发现有值,则用其覆盖 __afl_area_ptr ,跳转到 __afl_store ,执行常规的 hit count++;如果发现 GOT 表中的这个 __afl_global_area_ptr 指针为 0,则跳转到 __afl_setup_first ,开始初始化共享内存区域。
__afl_setup_first:

  /* Save everything that is not yet saved and that may be touched by
     getenv() and several other libcalls we'll be relying on. */

  leaq -352(%rsp), %rsp

  movq %rax,   0(%rsp)
  movq %rcx,   8(%rsp)
  movq %rdi,  16(%rsp)
  movq %rsi,  32(%rsp)
  movq %r8,   40(%rsp)
  movq %r9,   48(%rsp)
  movq %r10,  56(%rsp)
  movq %r11,  64(%rsp)

  movq %xmm0,  96(%rsp)
  movq %xmm1,  112(%rsp)
  movq %xmm2,  128(%rsp)
  movq %xmm3,  144(%rsp)
  movq %xmm4,  160(%rsp)
  movq %xmm5,  176(%rsp)
  movq %xmm6,  192(%rsp)
  movq %xmm7,  208(%rsp)
  movq %xmm8,  224(%rsp)
  movq %xmm9,  240(%rsp)
  movq %xmm10, 256(%rsp)
  movq %xmm11, 272(%rsp)
  movq %xmm12, 288(%rsp)
  movq %xmm13, 304(%rsp)
  movq %xmm14, 320(%rsp)
  movq %xmm15, 336(%rsp)

  /* Map SHM, jumping to __afl_setup_abort if something goes wrong. */

  /* The 64-bit ABI requires 16-byte stack alignment. We'll keep the
     original stack ptr in the callee-saved r12. */

  pushq %r12
  movq  %rsp, %r12
  subq  $16, %rsp
  andq  $0xfffffffffffffff0, %rsp

  leaq .AFL_SHM_ENV(%rip), %rdi
call getenv@PLT

  testq %rax, %rax
  je    __afl_setup_abort

  movq  %rax, %rdi
call atoi@PLT

  xorq %rdx, %rdx   /* shmat flags    */
  xorq %rsi, %rsi   /* requested addr */
  movq %rax, %rdi   /* SHM ID         */
call shmat@PLT

  cmpq $-1, %rax
  je   __afl_setup_abort

  /* Store the address of the SHM region. */

  movq %rax, %rdx
  movq %rax, __afl_area_ptr(%rip)

  movq __afl_global_area_ptr@GOTPCREL(%rip), %rdx
  movq %rax, (%rdx)
  movq %rax, %rdx

__afl_forkserver:
/* ...... */
观察 __afl_setup_first 过程。它首先把一些 caller-save 寄存器保存在栈上(这是为了方便后续在 fork server 中恢复原有寄存器状态)。在做完这些保存工作之后,作者写了这四行代码:
  /* The 64-bit ABI requires 16-byte stack alignment. We'll keep the
     original stack ptr in the callee-saved r12. */

  pushq %r12
  movq  %rsp, %r12
  subq  $16, %rsp
  andq  $0xfffffffffffffff0, %rsp
保存 r12 寄存器的值;然后用 r12 寄存器记录原始的 rsp;把 rsp 减去 16,并清空最低 4 bit。注释中提到,根据 ABI 要求,栈地址要做 16 字节对齐。这样一顿操作之后, rsp 一定是 16 的倍数了。
继续往下看:
  leaq .AFL_SHM_ENV(%rip), %rdi
call getenv@PLT

  testq %rax, %rax
  je    __afl_setup_abort
调用 getenv("__AFL_SHM_ID"),如果返回 0 则进入 __afl_setup_abort 错误处理流程,否则往下继续执行。我们先去看错误处理流程:
__afl_setup_abort:

  /* Record setup failure so that we don't keep calling
     shmget() / shmat() over and over again. */

  incb __afl_setup_failure(%rip)

  movq %r12, %rsp
  popq %r12

  movq  0(%rsp), %rax
  movq  8(%rsp), %rcx
  movq 16(%rsp), %rdi
  movq 32(%rsp), %rsi
  movq 40(%rsp), %r8
  movq 48(%rsp), %r9
  movq 56(%rsp), %r10
  movq 64(%rsp), %r11

  movq  96(%rsp), %xmm0
  movq 112(%rsp), %xmm1
  movq 128(%rsp), %xmm2
  movq 144(%rsp), %xmm3
  movq 160(%rsp), %xmm4
  movq 176(%rsp), %xmm5
  movq 192(%rsp), %xmm6
  movq 208(%rsp), %xmm7
  movq 224(%rsp), %xmm8
  movq 240(%rsp), %xmm9
  movq 256(%rsp), %xmm10
  movq 272(%rsp), %xmm11
  movq 288(%rsp), %xmm12
  movq 304(%rsp), %xmm13
  movq 320(%rsp), %xmm14
  movq 336(%rsp), %xmm15

  leaq 352(%rsp), %rsp

  jmp __afl_return
这就是把 __afl_setup_failure 变量自增,还原所有寄存器并返回。至此,我们发现,如果环境变量 __AFL_SHM_ID 不存在,则共享内存的初始化会失败,但整个桩代码对于目标程序是透明的——无非是保存了一些寄存器、执行了一些无副作用的代码、最后恢复寄存器——因此目标程序可以正常执行。这也解释了为何我们不使用 afl-fuzz 而直接运行插桩后的目标程序,也能执行如常。这个设计体现了 AFL 的用户友好性。
回过头来看,如果环境变量 __AFL_SHM_ID 存在,将会发生什么事情。代码如下:
/* 此时 %rax 是指向环境变量 __AFL_SHM_ID 的指针  */
  movq  %rax, %rdi
call atoi@PLT

  xorq %rdx, %rdx   /* shmat flags    */
  xorq %rsi, %rsi   /* requested addr */
  movq %rax, %rdi   /* SHM ID         */
call shmat@PLT

  cmpq $-1, %rax
  je   __afl_setup_abort
首先把 __AFL_SHM_ID 从字符串转成整数,然后调用 shmat(shmid, 0, 0) 。
shmat 是 shared memory attach 的缩写,用于 attach 共享内存。三个参数分别为
(int shmid, const void *shmaddr, int shmflg) :-
shmid 是环境变量提供的;-
shmaddr 等于 0,则交由操作系统自行选择一片地址空间;-
shmflg 等于 0,采用默认设置。函数的返回值是共享内存起点的位置。若 attach 失败,则返回 $-1$。
上面的汇编代码中,如果发现 attach 失败,则进入 AFL 的错误处理流程。不过读到这里,我们有一个小疑问:一片共享内存,首先应当由 shmget() 创建,再由 shmat() 映射到当前程序的虚拟内存空间中。那么,这片虚拟内存是什么时候创建的?答案是 afl-fuzz 在 setup_shm() 流程中调用 shmget() 创建了虚拟内存,并将 shm id 写入 __AFL_SHM_ID 环境变量。如果我们并非通过 afl-fuzz 运行程序,自然这片虚拟内存不会被创建,也不会存在 __AFL_SHM_ID 环境变量了。
至此,程序成功地将 afl-fuzz 进程所创建的一片共享内存,映射到了自己的虚拟地址空间内。接着看汇编:
  /* Store the address of the SHM region. */

  movq %rax, %rdx
  movq %rax, __afl_area_ptr(%rip)

  movq __afl_global_area_ptr@GOTPCREL(%rip), %rdx
  movq %rax, (%rdx)
  movq %rax, %rdx

__afl_forkserver:
/* ...... */
将共享内存区域的地址存进 __afl_area_ptr,并写进 GOT 表中的 __afl_global_area_ptr 条目。最后,用 rdx 寄存器存放共享内存地址,进入 fork server。
为何同时有 __afl_area_ptr 和 __afl_global_area_ptr ?我们来看它们的定义,位于 main payload 尾部:
.AFL_VARS:

  .lcomm   __afl_area_ptr, 8
  .lcomm   __afl_prev_loc, 8
  .lcomm   __afl_fork_pid, 4
  .lcomm   __afl_temp, 4
  .lcomm   __afl_setup_failure, 1
  .comm    __afl_global_area_ptr, 8, 8

.AFL_SHM_ENV:
  .asciz "__AFL_SHM_ID"

/* --- END --- */ 可以看到,__afl_area_ptr 是一个 lcomm,而 __afl_global_area_ptr 是一个 comm 。根据一篇 Stackoverflow 问答,lcomm 有点类似于全局 static 变量,不同文件中的重名 lcomm 是指向不同的地址;但 comm 有点类似于全局变量,不同文件中的重名 comm 指向同一个地址。
因此,这个问题的解答是:假如目标程序是多份代码链接形成的,那么,每份汇编文件都拥有 AFL main payload;对于编译出的每个代码片段,都会有自己对应的 __afl_area_ptr 。但 __afl_global_area_ptr 只有一份,只需要优先参考 __afl_global_area_ptr ,就能让所有桩代码访问的 shm 保持一致。
实验一下。写两份代码,合并编译,观察 bss 段,证明我们的解释是正确的:
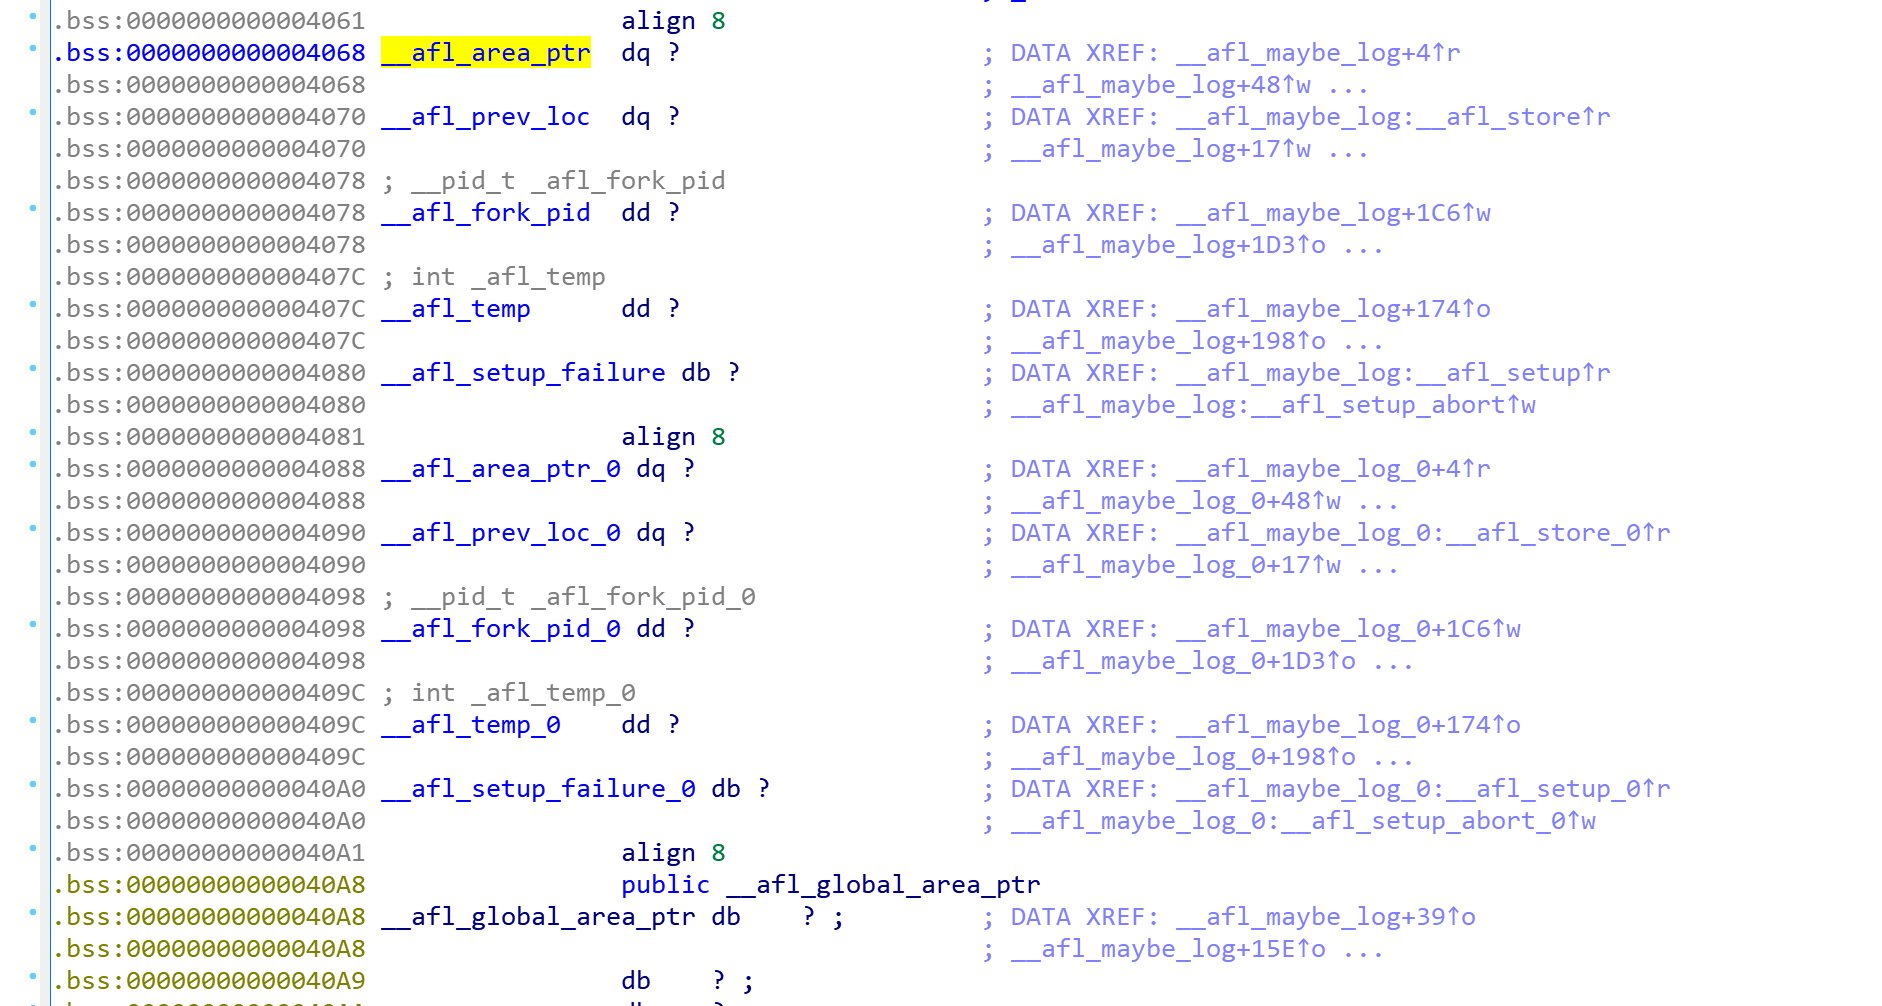
afl-gcc main.c fun.c ,有两个不同的 __afl_area_ptr ,但只有一个 __afl_global_area_ptr 以上,我们分析完了 shm 是如何初始化的。接下来,该分析 fork server 了。
0x02 fork server
AFL 白皮书中提到,execve() 的效率比较低。fuzzer 需要高频率地执行目标程序,显然不宜在 execve() 上浪费过多时间。AFL 的解决方案是使用 fork server:让程序在第一个基本块处停下,等待 fuzzer 发送指令;收到指令后继续执行程序;执行完毕后,恢复 fork 时的状态。得益于 copy-on-write 技术,我们可以高效地实现这一需求。
来看汇编代码:
__afl_forkserver:

  /* Enter the fork server mode to avoid the overhead of execve() calls. We
     push rdx (area ptr) twice to keep stack alignment neat. */

  /* 此时 %rdx 内保存 shm 地址 */
  pushq %rdx
  pushq %rdx

  /* Phone home and tell the parent that we're OK. (Note that signals with
     no SA_RESTART will mess it up). If this fails, assume that the fd is
     closed because we were execve()d from an instrumented binary, or because
     the parent doesn't want to use the fork server. */

  movq $4, %rdx               /* length    */
  leaq __afl_temp(%rip), %rsi /* data      */
  movq $(198 + 1), %rdi       /* file desc */
call write@PLT

  cmpq $4, %rax
  jne  __afl_fork_resume

__afl_fork_wait_loop:
/* ...... */
把 shm 地址连续压栈两次(以保证 esp 仍然是 16 的倍数),然后调用 write(198+1, __afl_temp, 4)。其中,198 这一 magic number,是 config.h 中的 FORKSRV_FD 常量。fork server 使用 198、199 这两个 fd 传递指令。而 __afl_temp 是 bss 段的长度 4 字节的变量。
如果这四个字节写入失败(write() 的返回不等于 4),则直接进入 __afl_fork_resume 逻辑;否则,进入 __afl_fork_wait_loop 逻辑。
跟进 __afl_fork_wait_loop:
__afl_fork_wait_loop:

  /* Wait for parent by reading from the pipe. Abort if read fails. */

  movq $4, %rdx               /* length    */
  leaq __afl_temp(%rip), %rsi /* data      */
  movq $198, %rdi             /* file desc */
call read@PLT
  cmpq $4, %rax
  jne  __afl_die
从 fd 198 中读取四个字节(注意 read() 函数是阻塞的)。如果读取失败,则跳转到 __afl_die。如果读取成功,则执行下面的代码:
  /* Once woken up, create a clone of our process. This is an excellent use
     case for syscall(__NR_clone, 0, CLONE_PARENT), but glibc boneheadedly
     caches getpid() results and offers no way to update the value, breaking
     abort(), raise(), and a bunch of other things :-( */

call fork@PLT
  cmpq $0, %rax
  jl   __afl_die
  je   __afl_fork_resume
在这里进行 fork,如果失败了则跳转到 __afl_die。对于子进程,跳转到 __afl_fork_resume ;对于父进程,则继续执行以下逻辑:
  /* In parent process: write PID to pipe, then wait for child. */

  movl %eax, __afl_fork_pid(%rip)

  movq $4, %rdx                   /* length    */
  leaq __afl_fork_pid(%rip), %rsi /* data      */
  movq $(198 + 1), %rdi             /* file desc */
call write@PLT

  movq $0, %rdx                   /* no flags  */
  leaq __afl_temp(%rip), %rsi     /* status    */
  movq __afl_fork_pid(%rip), %rdi /* PID       */
call waitpid@PLT
  cmpq $0, %rax
  jle  __afl_die

  /* Relay wait status to pipe, then loop back. */

  movq $4, %rdx               /* length    */
  leaq __afl_temp(%rip), %rsi /* data      */
  movq $(198 + 1), %rdi         /* file desc */
call write@PLT

  jmp  __afl_fork_wait_loop
这段代码逻辑是:将子进程的 pid 保存到 __afl_fork_pid 变量;向 fd 199 写入子进程的 pid;调用 waitpid() 等待子进程执行完毕(如果等待失败,则进入 __afl_die);将子进程的退出原因写进 fd 199,并回到 __afl_fork_wait_loop。
之前提到,fork 之后,子进程会跳转到 __afl_fork_resume 逻辑。跟进:
__afl_fork_resume:

  /* In child process: close fds, resume execution. */

  movq $198, %rdi
call close@PLT

  movq $(198 + 1), %rdi
call close@PLT

  popq %rdx
  popq %rdx

  movq %r12, %rsp
  popq %r12

  movq  0(%rsp), %rax
  movq  8(%rsp), %rcx
  movq 16(%rsp), %rdi
  movq 32(%rsp), %rsi
  movq 40(%rsp), %r8
  movq 48(%rsp), %r9
  movq 56(%rsp), %r10
  movq 64(%rsp), %r11

  movq  96(%rsp), %xmm0
  movq 112(%rsp), %xmm1
  movq 128(%rsp), %xmm2
  movq 144(%rsp), %xmm3
  movq 160(%rsp), %xmm4
  movq 176(%rsp), %xmm5
  movq 192(%rsp), %xmm6
  movq 208(%rsp), %xmm7
  movq 224(%rsp), %xmm8
  movq 240(%rsp), %xmm9
  movq 256(%rsp), %xmm10
  movq 272(%rsp), %xmm11
  movq 288(%rsp), %xmm12
  movq 304(%rsp), %xmm13
  movq 320(%rsp), %xmm14
  movq 336(%rsp), %xmm15

  leaq 352(%rsp), %rsp

  jmp  __afl_store
首先关闭从父进程那里继承来的 fd 198、199,然后恢复所有寄存器,恢复栈地址,跳转到 __afl_store。而 __afl_store 在增加 hit count 之后,跳转回 AFL 往基本块头部插入的桩代码——到此为止,子进程恢复所有状态,开始了程序中第一个基本块的执行。
0x03 总结
AFL main payload 设计得相当精妙。它让程序在第一个基本块处停下,初始化共享内存,并每次从这个位置 fork 出子进程、恢复程序状态、继续执行业务逻辑;子进程执行完后,fork server 则向 fuzzer 报告执行情况,开始新一轮执行。通过 fork server,AFL 得以避免频繁的 execve 调用,从而提升了 fuzz 效率。
共享内存由 afl-fuzz 程序建立,其 shm id 记录在环境变量 __AFL_SHM_ID 中。目标程序初始化时,会将这块共享内存 attach 到自己的虚拟地址空间,从而 afl-fuzz 进程可以统计 hit count。
fork server 的动作由 afl-fuzz 进程控制。目标程序与 afl-fuzz 透过 fd 传递信息——fd 198 用于 fuzzer 向 fork server 发送启动指令,fd 199 用于 fork server 向 fuzzer 报告子进程的 pid 和执行结果。
与直觉相反,一个运行超时的子进程,并不是由 fork server 结束的,而是由 afl-fuzz 结束的。这些内容要等到我们阅读 afl-fuzz.c 时才能细致掌握。
总之,我们已经阅读完了 afl-gcc.c 和 afl-as.c 这两份代码,对插桩过程有了详细的了解。按照计划,我们接下来将阅读 afl-tmin.c ,以了解 AFL 是如何收集、处理程序的覆盖度信息。